Instructions for a quick setup
Recently, I had to livestream an event for a dear friend of mine within very short notice. I spent quite some time trying out what worked and what did not. Hopefully, this write-up will help some of you, and indeed myself as well in the future.Requirements
First off, I needed to decide on which platform I was to do my live streaming. The main requirements for me were1. The ability to accommodate viewers without the need for them to sign up for an account
2. Can be deployed within a very short time. For me, it was 24 hours.
3. Streaming was to be done from a mobile device. Here, it was an iPhone.
4. This would be a once off event, so everything needed to be simple, without bells and whistles. A free solution would be a big plus. If I were an online influencer, I may have considered paid options.
5. Already having an account on the platform would be a bonus, but creating an account on a new platform wouldn't have been a problem either.
Streaming platform
First off, some online investigations. The two big leaders are YouTube Live and Facebook Live, both of which I have had some experience as a user but not as a streamer. In addition, I also have accounts with both.I first tried YouTube. To do live streaming, one needs to activate the account to allow live streaming. However, Google, the owner of YouTube will only do so within 24 hours.
Unfortunately, that would have cut if too close for me. Moreover, I also found out that to be able to stream from a mobile device, one needs to have 1,000 fans or followers.
Having said that, there are some apps that allows one to live stream onto YouTube without the need to meet that requirement.
That left me with only Facebook Live.
Facebook Live
I did not wish to make my Facebook account a public account. I still valued my privacy, however much it has been eroded by the encroachment by online companies.Fortunately, Facebook provided a way to have a public persona in the form of Pages.
Think of it like having a shopfront below your apartment, the latter having a concealed door.
Now that we have gotten all that out of the way, sit tight, here we go. This guide is written for an iPhone as the Live streaming device, but I believe on Android the procedure is similar. One caveat is that Facebook's user interface is very dynamic and changes too frequently for my liking. You will need to find the changed features if this happens.
Create a Page
 |
| Create Page |
First step is to create a page. To do this, log in to your Facebook account. I did this on a computer. I'm not sure if the mobile Facebook app will give you the same level of configuration. Then click on Create on the Facebook top bar. Then from the dropdown, click on Page.
After this, answer a few questions to determine the type of page to create. I chose a community page. What follows next are two other screens which prompts for more information.
 |
| Choose the type of page |
After this, answer a few questions to determine the type of page to create. I chose a community page. What follows next are two other screens which prompts for more information.
 |
| Details of the page |
 |
| More details |
Configure the page
You have now created the page and it is time to do some configuration. |
| Select page from menu |
To do so, from your Facebook profile page, click Pages from the menu on the left column under Explore. Then, select the page you have just created.
 |
| Configure the page |
Firstly, give the page that you've just created a username. This will form part of the URL that you will distribute to your intended viewers. To do this, click on About on the left menu and click on Username to set it.
Continue to configure your page
Continue to configure your page
 |
| Page Settings |
Clicking on Settings on the top Facebook bar will allow you to describe the page, among other things. Most of the configuration is quite self-explanatory.
 |
| General Settings |
One key setting for me was to make this a public page, so that non-Facebook users would be able to view it. This is done in the General Settings which is accessed by clicking on General on the left hand menu. Under age restrictions, select the most permissive level.
I have read in some other blogs that I should set it to 13 and Above, but in my case, it was Public.
I have read in some other blogs that I should set it to 13 and Above, but in my case, it was Public.
Live stream from iPhone
You are now ready to do live streaming on your iPhone. First, log in to the Facebook app. |
| Select page |
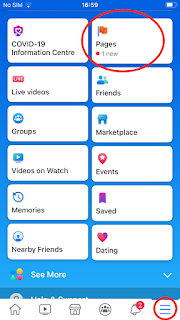
Then select the Page by first tapping on menu icon at the bottom, the one with the three horizontal bars.
 |
| Posting a Live stream |
Then, on that page, proceed to create a live post by tapping on the Live icon.
 |
| Camera showing me live-streaming my webcams |
This will bring you to a screen that shows the output of the camera. You might be asked to give Facebook access to the camera and the microphone, if you have done so before. There are some basic controls for the camera, like changing the orientation from portrait
to landscape by rotating your phone. Note at point that the orientation cannot be changed again later during filming, so decide now how you want your filming to be.
Once you are ready, press the record button to start streaming to your heart's content.
to landscape by rotating your phone. Note at point that the orientation cannot be changed again later during filming, so decide now how you want your filming to be.
Once you are ready, press the record button to start streaming to your heart's content.


